• About

Good Cooks

~ recipes & tries from simple to sensational !

Good Cooks

Tag Archives: Middle East

Smile and Say Cheese: How to Make Halloumi at Home & Fried Halloumi Salad

10 Monday Jun 2013

Posted by Good Cooks in Appetizer & Sides, Breakfast & Brunch, Middle Eastern, Pantry Food, Recipes, Salad

≈ 5 Comments

Tags

cheese, cheese making, cow's milk, fried halloumi, from scratch, halloumi, Homemaid, How to, How to make halloumi at home, making cheese at home, Mezze table, Middle East, Rennet, step by step, Za'tar

Why to pay high prices for halloumi cheese while you can make it at home? You will be amazed how easy it is!

OLYMPUS DIGITAL CAMERA

I like making things from scratch, especially if it is much expensive to buy from stores. I know, mostly I don’t have time to do everything, but making thing from scratch makes me proudly happy. Being a middle eastern, I grew up eating cheese from that kind- the white and salty brined cheese, the twisted or Mojadallah, Kashkawan the creamy cheese. There were also many kinds of imported yellow cheeses, but not really my big fan.

The white brined cheese is a kind of cheese which is an everyday stable food on the middle eastern table in savory or sweet dishes, delicious and rich that you can’t stop eating.

OLYMPUS DIGITAL CAMERA

Like the Nabulsi and Akawi cheese, halloumi is one of many kinds of traditional white Middle Eastern brined cheese. Originally from Cyprus and also known in various countries of the middle east, particularly in Palestine, Jordan, Syria and Lebanon. It is produced mainly from goat and sheep milk, although cow’s milk is now widely used in making this kind of cheese(the one which I used with the addition of more fresh cream to the milk), or a combination of the sheep and cow’s milk.

I like to add flavors to the cheese, with mahlab (Prunus mahaleb) and mastic (Pistacia lentiscus) added to the boiling brine, or sometimes flavored with black sesame seed which added to the brine after boiling.

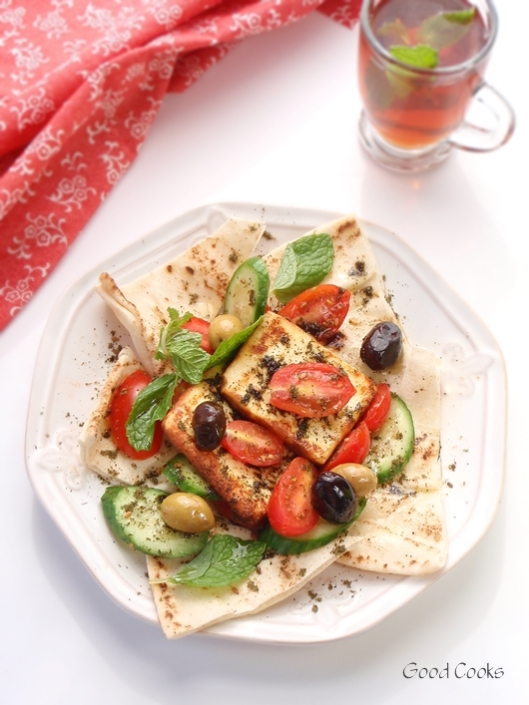
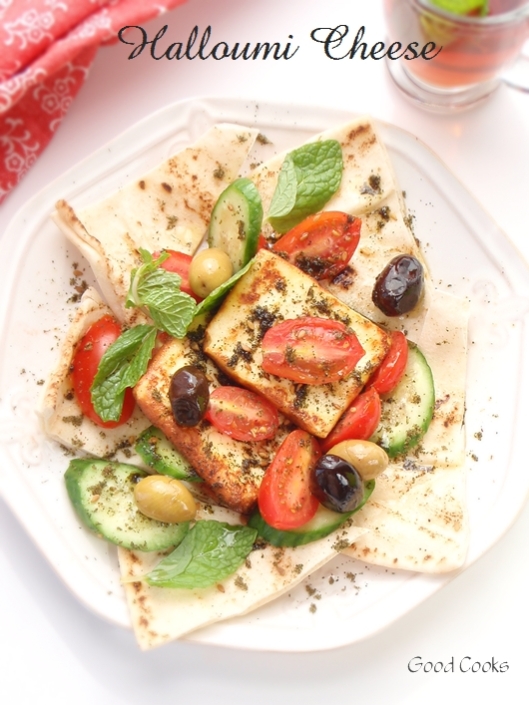
Halloumi texture is firm and rubbery until grilled or pan-fried, then It becomes crispy on the outside and soft and elastic In the middle. It is commonly used as a salty table cheese, it can be fried in oil, or grilled. The flavor is similar to mozzarella, only with more salt.

Halloumi Cheese

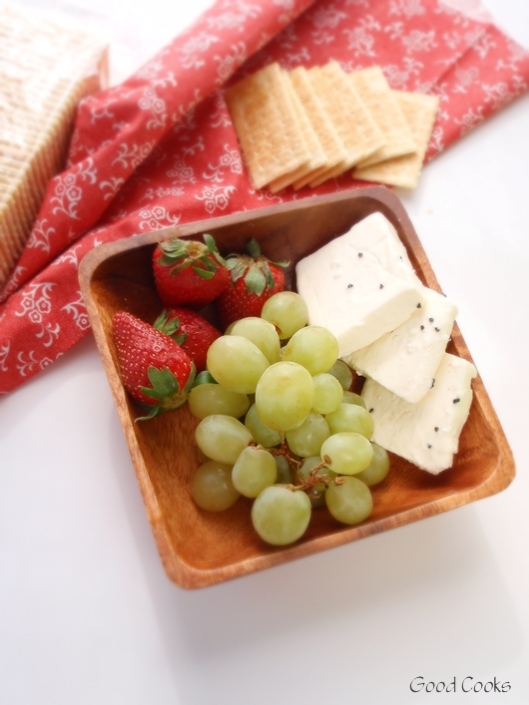
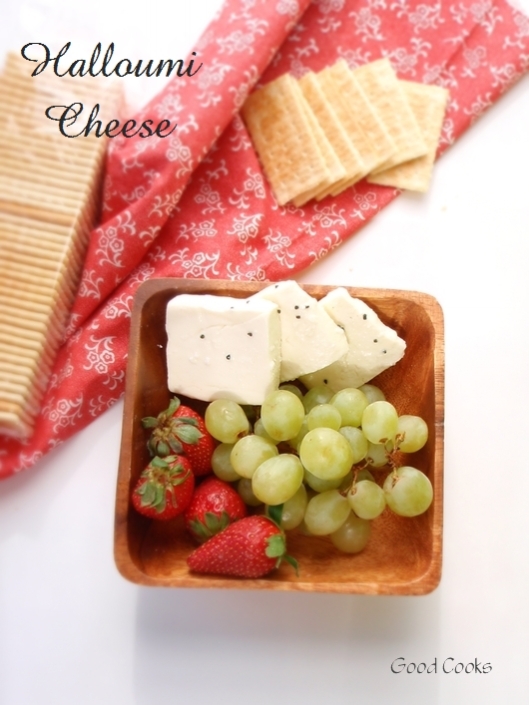
Generally, as a table cheese, I enjoy serving it as part of mezze with some fruits and crackers on the side.

It is also used as a filling in savory pastries, like in the Minted Cheese Stuffed Rolls 

Holloumi is wonderful when grilled or fried, served at breakfast or brunch. I like it fried in olive oil, sprinkled with Za’tar spice mix, served with some pita bread and some fresh vegetable. Serve it straight from the pan, as it becomes rubbery when cool.

Hallomi Salad

Equipments to make the cheese:

No special equipment required to make halloumi cheese, but you need at least a large pot to heat the milk, thermometer, colander, sieve, cheese cloth or muslin cotton cloth

Step By Step on How to Make Halloumi at Home:

2 gallons vitamin D cow’s milk
2 cups fresh cream (whipping cream)
1 teaspoon pickling salt + 1/2 more for the brine
1/4 tablet rennet
1/2 cup cold milk
1 teaspoon mahleb
1/2 teaspoon mastic

I started with 2 gallon of milk, full-cream and not homogenized. In a spice infuser, place 1/4 teaspoon crushed mastic gum and 1/4 teaspoon crushed mahleb, immerse in the milk while heated. Heat milk to 85-90 f (use the thermometer) slowly on low heat in heavy stainless steel sauce-pan (do not use aluminum). Add the cream and the pickling salt, stir the milk. Add the dissolved rennet, I used the tablet rennet(follow the instruction on the rennet), dissolve 1/4 tablet (you have to crush it first)into 1/2 cup cold milk, stir then add to the heated milk, stir quickly for 1 min.

Let the milk rest for 45-60 minutes (or until a clean break), covering the pot with a lid and keeping the temperature constant on 85-90 f (you may like to place the pot into a bigger pot with hot water, or wrap it with a warm towel, or keep it in a pre heated oven (warm the oven for couple of minutes then turn the heat off).

To check for a clean break, use a knife to make a cut through the curd.

Cut the curd into 1/2 inch cubes.

cheese making 1

Using a large hand sieve, take some clotted cheese, shake lightly to drain out some of the whey, place in cheese cloth lined colander. Fold the corners of the cloth over the cheese, and place a heavy weight on the top, let set to drain for 1-2 hours. Reserve the whey.

cheese making 2

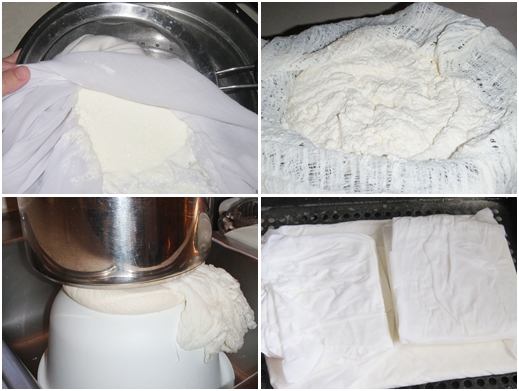
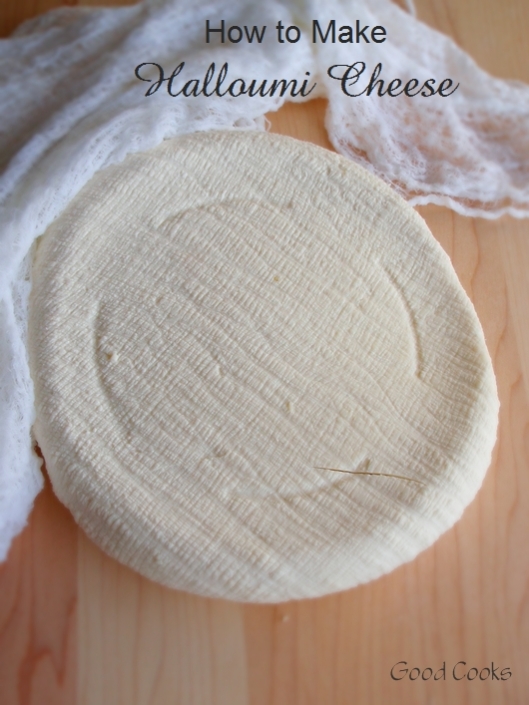
The cheese should be firm with spongy consistency. Take the cheese from the mold and cut it into 2″ thick strips, add sprinkle with salt and let aside.

How to Make Hallomi Cheese

Make a brine with 2 quarts of the whey and 1/4 cup pickling salt. Add the mastic and mahlab infuser ball. Bring to a boil, add the cheese pieces, let boil for 1 min, then take the cheese pieces into clean linen lined shallow dish.

cheese making 3

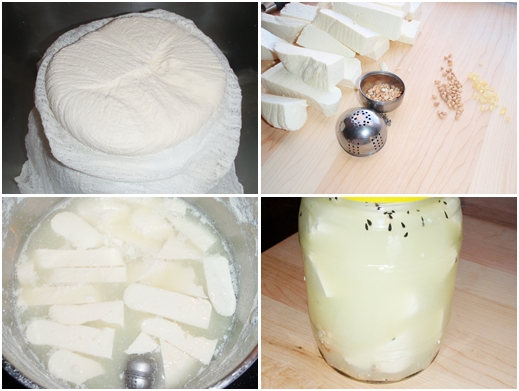
Arrange the cheese in the jars, add the brine to fill the top, sprinkle some nigella seed. Reserve in the refrigerator.

OLYMPUS DIGITAL CAMERA

Some tips:

Using the Rennet

You can use the tablet rennet, follow the directions on how to use it. Usually found at cheese making stores, or at the internet. I bought mine from a pharmacy in the middle east. There is also liquid rennet available. When purchasing the rennet, just make sure to ask about the source, especially if you are seeking kosher.

Flavoring the Cheese

Halloumi has a distinctive flavor. In middle east most white cheeses flavored with mastic and mahlab, or nigella seeds, anise and caraway seeds might be used too, those can be found in middle eastern stores. Some other flavores used is mint, olives, or dried tomato. If you don’t have spice infuser, you can put the mastic and mahlab in small piece of cloth and wrap it around like a purse.

Brine Concentration

Brines used to store these cheeses are normally 16% salt, the minimum for minimizing unwanted bacteria growth.
Higher % salt can be used, but is not required and will make the cheese taste very salty.
Lower % salt will result in a more immediately edible cheese but with shorter shelf life due to unwanted bacteria growth

Base Fluid

Base fluid options for making brine for ripening cheese are water, a mixture of water and whey, or all whey from making cheese.
Using whey gives the brine a higher calcium component, also makes the brine ripened cheese more flavourful.

Before Serving
Because of being reserved in salty brine, soak the cheese in warm water for 1/2 an Hour, to get rid off some of the salt and this will also make the cheese more soft.

OLYMPUS DIGITAL CAMERA

Advertisement

Share this:

  • Click to share on Facebook (Opens in new window)
  • Click to share on Pinterest (Opens in new window)
  • Click to print (Opens in new window)
  • Click to email a link to a friend (Opens in new window)
  • Click to share on Twitter (Opens in new window)
  • Click to share on Reddit (Opens in new window)
  • Click to share on LinkedIn (Opens in new window)
  • Click to share on Tumblr (Opens in new window)

Like this:

Like Loading...

My All Favourite Pita Bread

13 Tuesday Mar 2012

Posted by Good Cooks in Bread and Pastries, Middle Eastern

≈ 11 Comments

Tags

Baking, Dough, Flour, gridler pita, Kneading, making freah bread at home, Middle East, Olive oil, pita bread, storing pita bread, whole wheat pita, خبز الشوايه, خبز بيتا, خبز عربي, عمل الخبز العربي بالبيتو تخزين الخبز

Born and raised in the Middle East, found it much difficult in the beginning at least, 13 years ago – to adapt here in US without pita bread served in the breakfast, or even in every meal. That was before I got to know every place in the city I’m living in. Although, after we introduced to some local stores who sell the pita, it was not like what I used to eat. So why will be amazed to make pita at home when I can buy it? At how much better the home-made pita than the commercial pita?
The home-made is much better, the texture is chewy and very soft, more pliable, and don’t tear when you fill it unlike the ones you bought from stores. Very hard to stop at one, the smell of the fresh bread is totally different. Once you start making your own bread, you and your family will be spoiled. Besides, it’s really fun to make, even the kids will enjoy it. While my memories always taking me to those beautiful childhoodish moments, where I was my grandma’s helper when making the pita at home, she was the best in making very delicious pita bread, with the aromatic calming smell of baked fresh pita, you will know you are home…

The pita bread originated in the holy land, dating back to Biblical times. Arabic bread, Kmaj or pita are all names refer to a round hollow crust evenly baked flat bread found throughout the Middle East. An air pocket forms in the middle during baking, turning the bread into balls of dough skin, they are flattened only once cool.
Knives, forks, and spoons aren’t necessary in most of middle eastern meals as long as bread is present. A single layer of bread torn into bite-sized pieces serves as a scooper of dips and salads, meat wrapper, olive twister, and plate cleaner.
When cut across the diameter, it provides an instant pocket to fill with any type of food. Triangles of bread are often fried, toasted or baked and used to embellish main courses. They also serve as bottom layer of many fattat (dishes using bread as a main component in which meat or chickpeas are heaped in layers over bread, then topped with alternating layers of rice and garlic flavoured yogurt, sprinkled with layers of pine nuts parsley and mint). Dried bread finds its way into salads much as using croutons.

Pita bread is best when it baked traditional way, in a very hot stone oven, but making pita bread at home is very easy too, and you can meet a very good result with home oven. I usually bake my bread on ceramic tile, after heating the oven at 500 deg f for at least 20 min. The quarry tiles (be careful not to use the glazed surface) also is very good for baking bread, usually found at home improvement stores. Pizza stone works also can be used.
Kneading the bread for sufficient time is a very important step in making pita, and this will assure the forming of the pocket or the puff inside the bread.
 Here is some important hints for making the pita:
1. the basic plan in making pita is to get steam inside to puff up inside the bread before the bread bakes. This is why you need soft moist dough with little fat in it. Also this is why the bread is baked in a very high temperature at the bottom of the oven.
2. If you are using a cookie sheet to bake the bread, thick one may not allow the heat to penetrate quickly enough to the pita bread dough. This will cause the bread to cook before it has a chance to puff up, so use thin cookie sheets.
Remember the basic for better pockets: Moist dough, sufficient Kneading, resting, very hot oven temperatures.

Pita Bread (all white dough)

1 package of dry yeast, 2 1\2 teaspoon
1/2 cup warm water
2 teaspoon granulated sugar
4-4 1\2 cups all-purpose flour
1 teaspoon salt
3 tablespoon dry milk
1 1\2 cup lukewarm water
2 tablespoon olive oil

Dissolve yeast in 1/2 cup of warm water. Add sugar and stir until dissolved. Let sit for 10-15 minutes until water is frothy.

Combine 4 cups of flour, milk and salt in large bowl, or the stand mixer bowl.

Make a small depression in the middle of flour and pour 1 tablespoon oil and yeast water in depression.

Slowly add 1 cup of warm water, using the hook attachment, stir to form a dough, add the rest of flour as kneaded, continue kneading until elastic, about 5-7 min.

Place dough on floured surface and knead for 5 minutes, add the remaining oil and knead some more to incorporate the oil into the dough. When the dough is no longer sticky and is smooth and elastic, it has been successfully kneaded.

Coat large bowl with oil and place dough in bowl. Turn dough upside down so all of the dough is coated. Allow to sit in a warm place for about 1\4 hour.

Once rested, pinch out 10-12 small pieces, depending on the size you like your pita. Place balls on floured surface. Let sit covered for 10 minutes.
Roll out each ball of dough with a rolling pin into circles. Using a wooden cutting board let this process more easy. Each should be about 5-6 inches across and 1/4 inch thick or more if you want it a little more thick.

place circles of dough on flat boards or a table, cover with dry cloth and let rise for 1 hour. Meanwhile, Preheat oven to 500 deg F. and make sure rack is at the very bottom of oven. Be sure to also preheat your baking sheet, if you are using a ceramic stone you will need to allow more time to heat.

Bake pita bread in batches for 2 minutes until the bread puffs up. Once puffed, flip them to the other side so the top side becomes the bottom on the sheet or stone, and the moisture surface is now exposed and rises more easily the other side, bake for 2 min more. Remove using a spatula and add other pita for baking. Cover and keep the pita in a kitchen cloth to keep it warm and soft.

Push down the puffed pita. Immediately place in storage bags. take your daily serving and store the rest in the freezer.

Whole Wheat Pita Bread


The same recipe as above, just add an equal amount of white and whole wheat flour, and may use more water than the white flour alone.

The Gridler Pita

The same recipe as the whole white, but cut in small balls and  baked in the gridler, which is more easy and quick especaillay with small amounts.


Storing Pita Bread

Pita bread will remain soft outside at room temperature in a bread box for 2 days, and up to a month in the freezer. Be sure to use freezer bags when storing in the freezer. I usually double the amount given in the recipe, and keep it in the freezer.
Don’t refrigerate it, it will dry out.

Share this:

  • Click to share on Facebook (Opens in new window)
  • Click to share on Pinterest (Opens in new window)
  • Click to print (Opens in new window)
  • Click to email a link to a friend (Opens in new window)
  • Click to share on Twitter (Opens in new window)
  • Click to share on Reddit (Opens in new window)
  • Click to share on LinkedIn (Opens in new window)
  • Click to share on Tumblr (Opens in new window)

Like this:

Like Loading...

Cauliflower and Beef stew with Yogurt Sauce

25 Wednesday Jan 2012

Posted by Good Cooks in Main dish, Meat dishes, Middle Eastern, Recipes, Vegetables & Stews

≈ 4 Comments

Tags

beef stew, cauliflower, chuck roast recipes, cooked yogurt sauce, laban, laban recipes, main dish, Middle East, middle eastern recipes, stew, yogurt recipes

Delicious family style recipe for meat smothered in yogurt sauce, flavoured with garlic, cardamom and spices, and perfect middle eastern dish to enjoy cauliflower stew.
My children simply adore any dish that is done using cooked yogurt. I wanted to share with you this easy way to add variety to your daily dishes.

In middle eastern countries, Stews are basic fare for every day family cooking and are always served with vermicelli rice or plain rice. They are popular because they provide a wide range of nutrients from the meat, the vegetables and the rice. They also have the advantage of being economical as a relatively small amount of meat can go a long way into feeding a large family.

Yogurt is essential to middle eastern cooking. For eating and making Labne (the yogurt cheese) low-fat greek yogurt is just perfect for your health matters. For cooking it’s preferable to use the full-fat yogurt.Just make sure it has no gelatin in it, since it’s no need Goat yogurt is the most  kind  used for making the yogurt sauce in the middle east.


Actually, the Levant Cuisine depends on two ways to prepare and use of yogurt sauce; the cold yogurt sauce that is served over salads, or cold appetizers or as a dip to many mediterranean finger food. While the hot or the cooked yogurt sauce is the base for many recipes. That requires cooked yogurt can be used with vegetable stews. Usually many choices of vegetable will be perfect to company with the yogurt sauce. This sauce is good also over stuffed vegetables (what is known as Mahashi in the middle east). While many meat dishes directly depends on the yogurt sauce, where is the stuffed kibbeh balls or dumplings stew with yogurt sauce is one dish that resembles how delicious is the cooked sauce.

Middle eastern dishes often go by the same name as many arab dishes, but the preparation of them can be quite different, as similar dish can be prepared in different ways through out the middle east.
Some of the dishes that depend on the yogurt sauce is :The Jordanian Mansaf (it’s considered the national dish in Jordan), Laban Immo (the well-known dish in Lebanon), while the same dish called Shakrieh (the Syrian famous cooked yogurt and meat dish), in Palestine it’s named as Laban Tabeekh.

Making the cooked yogurt sauce is very easy and tricky at the same time. While you need to get the creamy texture and thickly yogurt sauce, it’s a very important step to stabilize the yogurt for cooking, you will need to add cornstarch and/or egg whites to the yogurt before cooking. continuous stirring of the sauce while it’s simmering is a very essential step too in making the sauce, this will end up in very successful, thick and creamy yogurt sauce.
The old traditional way to prepare the yogurt sauce is with the dried yogurt, either what is called Jameed (the dried yogurt balls) or the Keshek (the powdered dried yogurt), this was the old way to store the yogurt for a long time, and still used especially for the Jordanian Mansaf recipe. Since that will take a very long process in preparing the yogurt, dry it, then used it as base for the sauce. Nowadays, where the fresh yogurt is available all the time, cow’s yogurt is perfect to make the cooked yogurt sauce.
The lamb meat is usually the kind of meat that is popular in the middle east in almost all dishes recalling the use of red meat, and where the cooked yogurt famous with.  But you can use the beef or even the chicken. I used the beef chuck roast in making this dish.

The aromatic spices also play a very big rule in the middle eastern cuisine, the flavour of cardamom and gloves lend an exotic flair to this enticing beef and cauliflower stew. To add what is essential in cooking, the flavour of sauted garlic paste with coriander gives the best flavor we all adored.

Finally,  the yogurt sauce is considered one of many sauces that is stable mark for many of stew dishes in the middle east, other sauces used like the tomato sauce, and the tahini sauce, are very popular in many dishes too.

For me, the stewed cauliflower and beef with yogurt sauce is one of my favorite ways to enjoy cauliflower and the cooked yogurt, as well. Some people like the tahini sauce instead of the yogurt, especially for the cauliflower stew, but the yogurt sauce is also perfect.

Cauliflower and Beef stew with Yogurt Sauce

For the meat:  

2 teaspoon olive oil, divided
2 pound boneless beef chuck roast, cut into 2 inch pieces
1 cup chopped onion
1\2 teaspoon of each ground: cardamom, cumin, coriander, black pepper, all spices
3-4 bay leaves
1 stick cinnamon

whole cauliflower head, cut into large floret
vegetable oil for deep-frying the cauliflower

basic yogurt sauce:

1 container 32 oz (2 lb) yogurt, all fat, sour is the perfect.
1 tablespoon corn starch
1\2 teaspoon cardamom
2 tablespoon minced garlic
coriander leaves, minced or ground dried coriander seeds
salt and pepper

To prepare the meat:

Season the meat pieces with ground spices like:black pepper, cardamom, coriander, cumin, don’t add salt at this time, it will toughen the meat, the salt will be added after cooking the meat.
In a pressure cooker, heat 1 tablespoon oil over medium heat, saute the beef pieces, this process is important; it’s not only give the meat extra flavor but also help trap all the juices inside the meat and this will end with very tender meat after cooking. Add the onion and saute for 2-3 min. Add cinnamon sticks, bay leaves and cover the meat entirely with water. Close pressure cooker cover securely.
Cook for 20-30 minutes at highest pressure at the beginning, then lower the heat to medium.
Strain meat broth and keep aside for future use (It is a good idea to use meat broth instead of water when cooking rice). Throw cinnamon sticks, bay leaves and reserve meat cubes.

For the cauliflower:
heat the oil in the deep fryer, wok, or large sauce pan, drop in the cauliflower floret, a few floret at a time and deep-fry to golden brown, turning the floret in the oil so they cook evenly, all will take 5 min. Remove with the skimmer or slotted spoon and drain on kitchen paper towels. Sprinkle with salt, pepper and  cumin.

For the yogurt sauce:
In another cooking pot, add the yogurt, dissolve the corn starch with 1\4 cup cold water the add it with the yogurt in the pot. Whisk into a thin yogurt, beat until smooth, in most of the time I use the immersion blender, it makes the process more easier. Place pot on medium heat, stir continuously with big spoon in one direction, bring to boil (you will see the bubble on the top while string), lower the heat and continue stirring until the yogurt is thick and creamy. It is important to stir continuously for the yogurt not to stick to the pan, and to help thicken and prevent it from getting grainy taste.

To finish the recipe:
Fold in the meat pieces, the cauliflower and some of the meat juices or stock, one cup at a time, stir to  adjust the thickness of the yogurt, add some more once it need it.
Heat 1 tablespoon olive oil or ghee in a small skillet add the minced garlic and coriander, sauté for 1 min on low heat.
Stir the garlic coriander mixer into the simmering yogurt, adjust the taste add salt and some more cardamom if you like it. Allow to simmer for five minutes before removing from heat.
Serve hot with rice pilaf, of vermicelli rice.

Cardamom Flavoured White Rice

2 cups of long grain rice
2 tablespoon vegetable oil
2 1\2 cups cold water or the meat broth
1\4 teaspoon cardamom

Rinse with cold water until water is clear. Drain. heat the oil in 1 1\2 quart sauce pan, add the rice, saute for 2-3 min while stirring.  Add hot water or the broth. Bring to a boil. Lower heat until pan can be covered without boiling over. Simmer covered 15 to 20 minutes, until water is all absorbed. Fluff rice with fork. Cover and allow to stand in a warm spot until serving.

Share this:

  • Click to share on Facebook (Opens in new window)
  • Click to share on Pinterest (Opens in new window)
  • Click to print (Opens in new window)
  • Click to email a link to a friend (Opens in new window)
  • Click to share on Twitter (Opens in new window)
  • Click to share on Reddit (Opens in new window)
  • Click to share on LinkedIn (Opens in new window)
  • Click to share on Tumblr (Opens in new window)

Like this:

Like Loading...

Search My Recipes….

Enter your email address to subscribe to this blog and receive notifications of new posts by email.

Join 2,429 other subscribers
Good Cooks

Promote Your Page Too
Follow Me on Pinterest

Popular Posts

Eggs on Hash
Farina Pudding Pie (Layali Lubnan).
Cauliflower and Beef stew with Yogurt Sauce
Ghraybey_Middle Eastern Butter Cookies
My Mom's Za'tar Spice Mix
Mushroom Oat Soup
Bulgur Pilaf with Ground Beef
Almond Crescent Cookies
March 2023
M T W T F S S
 12345
6789101112
13141516171819
20212223242526
2728293031  
« Jan    

Categories

  • Appetizer & Sides (29)
    • Salad (9)
    • Soup (4)
  • Beans & Legumes (4)
  • Bread and Pastries (9)
  • Breakfast & Brunch (23)
  • Daring Kitchen (15)
  • Dessert (32)
    • Cake, Cupcake, & Muffins (6)
    • Candy (1)
    • Chocolate (4)
    • Cookies (10)
    • Creamy Dessert (6)
  • Drinks (1)
  • Fruits (12)
  • Home projects (2)
  • Main dish (22)
    • Meat dishes (8)
    • Pasta (1)
    • Poultry (8)
    • Rice dishes (6)
    • seafood and fish (5)
    • Vegetables & Stews (6)
  • Middle Eastern (35)
    • Pantry Food (4)
  • Recipes (60)
  • Sandwiches & Pizza (6)
  • Seafood (2)
  • Snacks (6)
  • Vegetable (12)
    • Eggplant (4)

Flickr Photos

zatar spice mix 3zatar spice mix 4zatar spice mix 1zatar spice mix 2P1011243 strawberry rhubarb compotestrawberry rhubarb compote 2
More Photos

Featured on:

Certified Yummly Recipes on Yummly.com

Blog Submission Blog Sites
Promote Blog
Blog Community & Blog Directory
Blogs Blog Gadgets Alessandra

Featured Chef
Featured Chef
Featured Chef
Top Food Blogs

Meta

  • Register
  • Log in
  • Entries feed
  • Comments feed
  • WordPress.com

Archives

Tags

almond Appetizer & Sides apricot avocado Baking Banana Berry blueberry Bread and Pastries breakfast breakfast recipes brunch butter cookies Cake, Cupcake, & Muffins caramel Chicken chicken breast chocolate chocolate chip cinnamon coconut Cookie cookies cream cheese daring baker daring bakers daring cooks daring kitchen challenge Dessert desserts easy recipes eggplant fruit reserve Fruits ground beef homemade How to jam kids friendly legumes lentil light lunch main dish mango Meringue Middle East middle eastern middle eastern food middle eastern recipes Mint mushroom oatmeal pecan pomegranate molasses pudding Raisin raspberry Rhubarb rice dish rice pudding roasted chicken Salad sandwiches shrimp side dish Soup step by step strawberry sweets tea time tomato vegetarian Yogurt yogurt recipes بسكويت الزبده
Top Food Blogs<!-- var hr_currentTime = new Date();var hr_timestamp = Date.parse(hr_currentTime.getMonth() + 1 + "/" + hr_currentTime.getDate() + "/" + hr_currentTime.getFullYear()) / 1000;document.write(''); // -->

Blog at WordPress.com.

Privacy & Cookies: This site uses cookies. By continuing to use this website, you agree to their use.
To find out more, including how to control cookies, see here: Cookie Policy
  • Follow Following
    • Good Cooks
    • Join 340 other followers
    • Already have a WordPress.com account? Log in now.
    • Good Cooks
    • Customize
    • Follow Following
    • Sign up
    • Log in
    • Report this content
    • View site in Reader
    • Manage subscriptions
    • Collapse this bar
 

Loading Comments...
 

    %d bloggers like this: